using a curves plug-in
to edit pictures in photoshop elements
to edit pictures in photoshop elements
 this is the before picture - SOOC (Straight Out Of Camera)
not too shabby, but could definitely use some brightening
**Click on any of the screen shot pictures to enlarge**
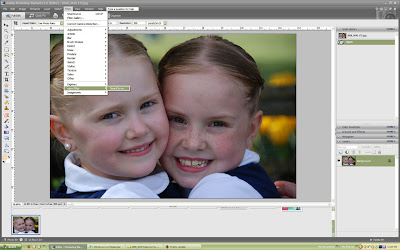 After installing the Smart Curve plug-in filter. Open your picture in PSE or PS (Photoshop Elements, or Photoshop). Click Filter > easy.Filter > Smart Curve to open the curves filter.
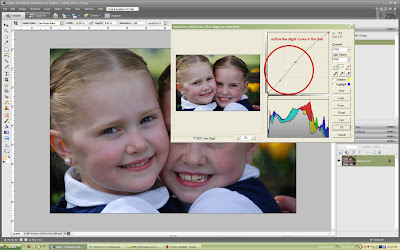 In the Smart Curve pop-up window there is a line that goes diagonally across the box in the upper right corner. Click somewhere near the center , and drag the line slightly up toward the upper left corner of the box. Now click toward the bottom of the line, and drag it slightly lower. (Notice the curve it creates in the screen shot above.) You're going to want to adjust your picture in steps, so don't worry about lightening it all at once.
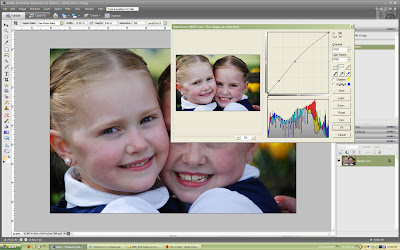 Repeat the same step again, making more slight adjustments.
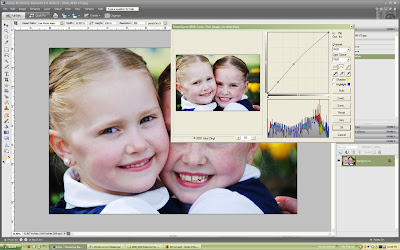 Repeat as many times as necessary to get your picture to the desired lightness. These adjustments will give the subjects in your pictures that milky looking skin tone that is popular in pictures right now.
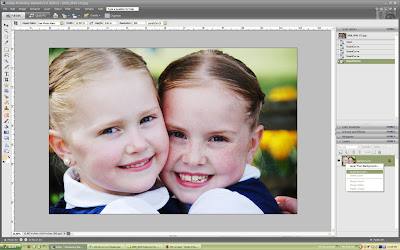 Now that your picture has been lightened using the curves filter, we're going to add some sharpening. Right click on the photo's thumbnail in the Layers Pallet and select Duplicate Layer on the fly out menu.
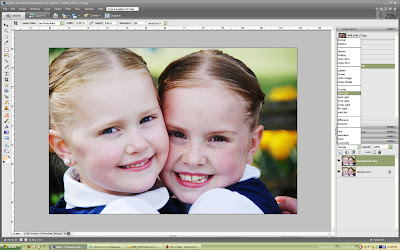 With the Duplicated Layer selected, we're going to change the Blending Mode. Click on the Blending Mode drop down menu and select Soft Light.
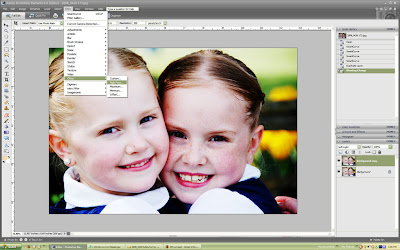 Now select Filter > Other > High Pass.
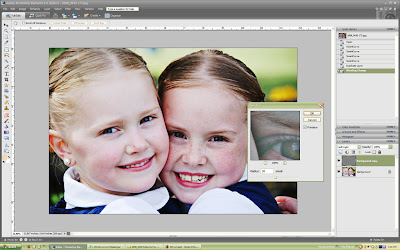 In the High Pass window, select the radius for your High Pass. I usually have mine set somewhere between 25 to 40 pixels. For this tutorial I selected 30 pixels for my radius. (You can experiment with different settings to see what you like best.) Once you've changed the radius to 30, click OK.
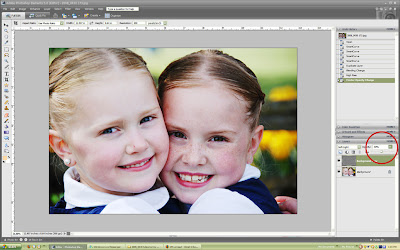 With the Duplicated Layer still selected, we're going to change the layer's opacity. I changed it to 40%. You can do this by clicking the Opacity drop down menu and using the slider, or by clicking in the box and typing in 40. Now your picture is sharpened for print.
Depending on how you're planning on using your picture, there are a few other processing tips you can use. Now, for the most part, I like to keep the pictures of my kids true to form. i.e. with scratches and bruises and chocolate milk mustaches in all their glory. However, there are times, say for Christmas cards, that you want a picture to be bruise & mustache free. For these special times, there is the Healing Brush.
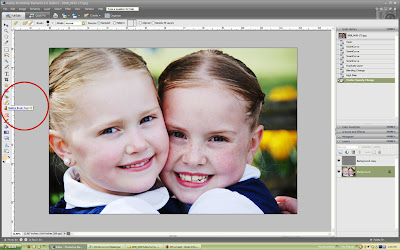 Click the Healing Brush icon on your tool bar. For this particular photo, I set my brush to 40 pixels. To remove the little scratch from Emma's nose, you simply move the healing brush right over the scratch, and click the mouse once. Repeat if necessary on other spots. The scratch magically disappears! Yahoo for Photoshop!
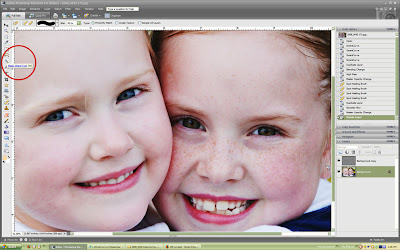 One other trick you see in photo processing right now are engaging eyes. Where the irises of the eyes are super sharp. Here is one way to accomplish that. Select the Magic Wand tool from the tool bar.
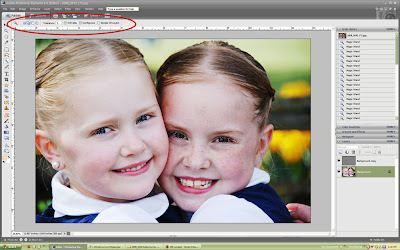 On the Magic Wand's tool bar, click on the two blue boxes which is the Add to Selection option. I also selected a tolerance of 5. (Anywhere beteen 5 and 10 works well for this type of selecting.) With your Background Layer selected, click on the iris of the eye. Continue clicking in the irises until they are completely selected. If you end up with other parts (say, the eyelids) selected, simply click on the white and blue box (Subtract from Selection) in the Magic Wand's tool bar, then click to subtract the unwanted area.
Once you are finished you should have a creepy looking dotted line around all of the irises in your picture.
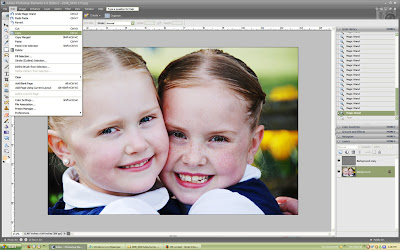 Click on Edit > Copy to copy the selection OR click CTRL and C (or on a Mac, Command and C)
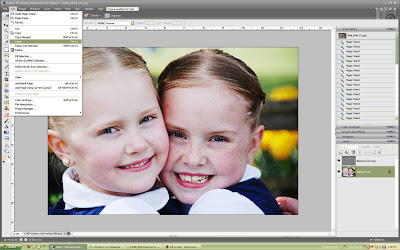 Then paste the selection by clicking Edit > Paste OR CTRL and V (Mac - Command and V)
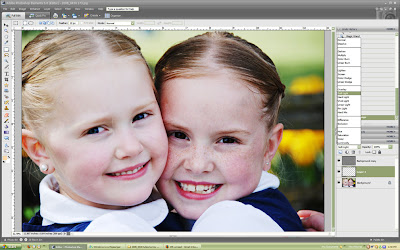 That pasted just the irises of the eyes onto a new Layer (Layer 1). With the new layer selected. Change the blending mode to Soft Light.
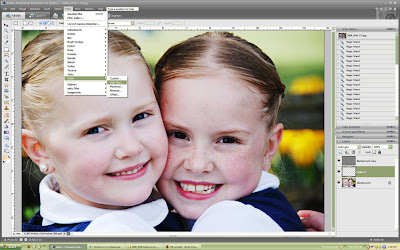 Now we're going to do another High Pass. Click Filter > Other > High Pass. In the High Pass window, 30 should still be the radius from before, so click OK.
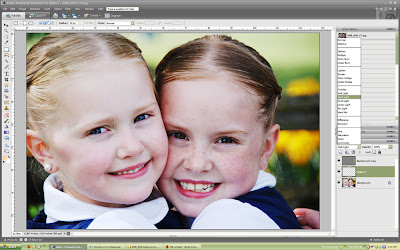 Now go back to the blending mode drop down menu, and select Hard Light. Depending on how much this made the eyes pop, you may want to lower the layer's opacity. I left mine at 100%, but be the judge on your photo. :)
To finish up and save. Right click on the photo's thumbnail, and select Flatten Image on the fly out menu. I like to keep the original copy of my photo just in case, so after editing I always select the Save As option. To do this, go to File > Save As OR CTRL and SHIFT and S. Then I usually just add an "A" to the end of my photo name. That way they're saved right next to each other in the same file.
 This is my post processing photo.
If you made it to the end of this post... you seriously should give yourself a pat on the back! lol. I got this cute little "award" today from my very talented cool scrapping friend Tracy. And I've been told I need to nominate 7 blogs that I really enjoy... so here goes...
 1. Oh Scrap! by the ever amazing Hawaiian chic Joscie
2. Just Us by the über talented Elizabeth
3. A Peek into my Life by my great scrappy friend Ali
4. Emilie Ahern by one of my great inspirations Emilie
5. decor8 - cool decorating blog
6. Hostess with the Mostess - a new favorite from just this week!
7. Easier Said than Done by my cool friend Laura
and one more just for kicks...
8. Blessed Beyond Belief by my digi scrappin mama

6 comments:
thanks so much!!!!!!
I cannot wait to give it a try;D
oh that is a cool tutorial....hum..even if I was number 8 out of 7...geez
posted my pic on my blog
hey, on a scale of 1 to 7... you are an 8!!! love you mama. :)
goodness, that was quite a lesson! How about I fly you here for let's say a week or two and you give me a full photoshop tutoring session! You did a great job explaining all of that. I especially like the eyes trick. Jackson got some pretty blue eyes that I can't seem to take enough pictures of them!
I come back and read this often... today I discovered this curves filter also helped correct white balance on snow. I love the filter and can't thank you enough for this post.
PS saw your LO in CK this month, congrats again.
Nice information. Your post looking well.
Custom E Liquid Boxes Packaging UK
Post a Comment