Showing posts with label photoshop. Show all posts

Monday, July 14, 2014

On Trend - Sunbursts

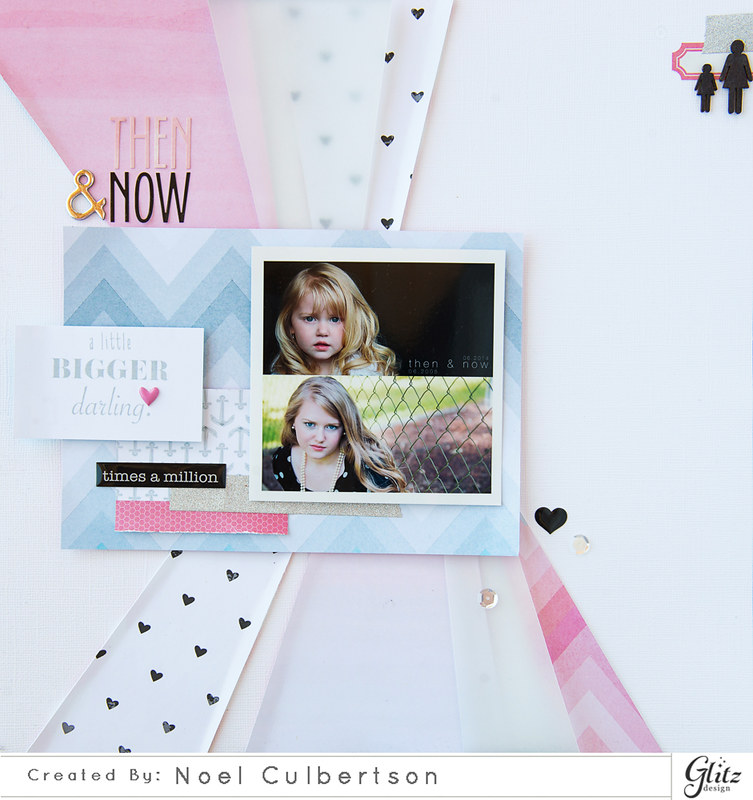
Hi there, happy Monday to you all! I love looking through internet galleries filled with inspiring ideas and trends. I've noticed a lot of beautiful pages using sunbursts or rays. I'm sure there is a proper name for the design, but that was the best I could come up with on the spot. Today I used some of the beautiful patterned papers from the newest Glitz Design collections to create a soft sunburst effect.


2014_0701_046b


2014_0701_002a

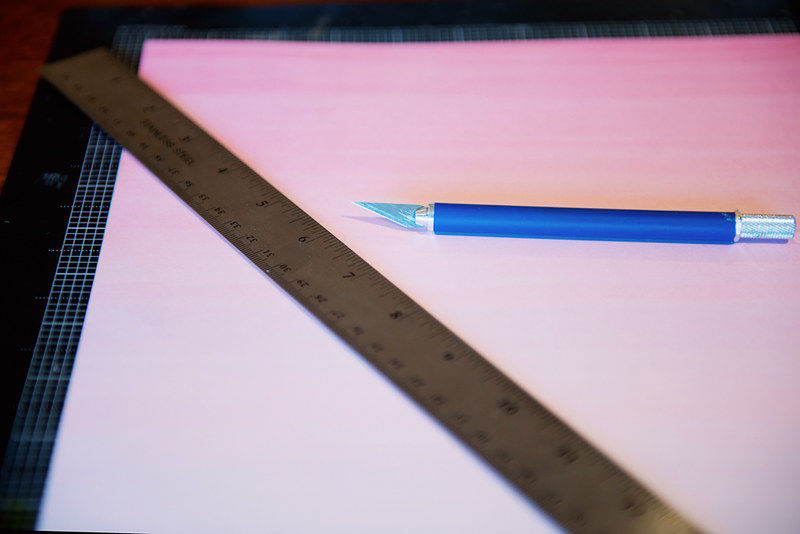
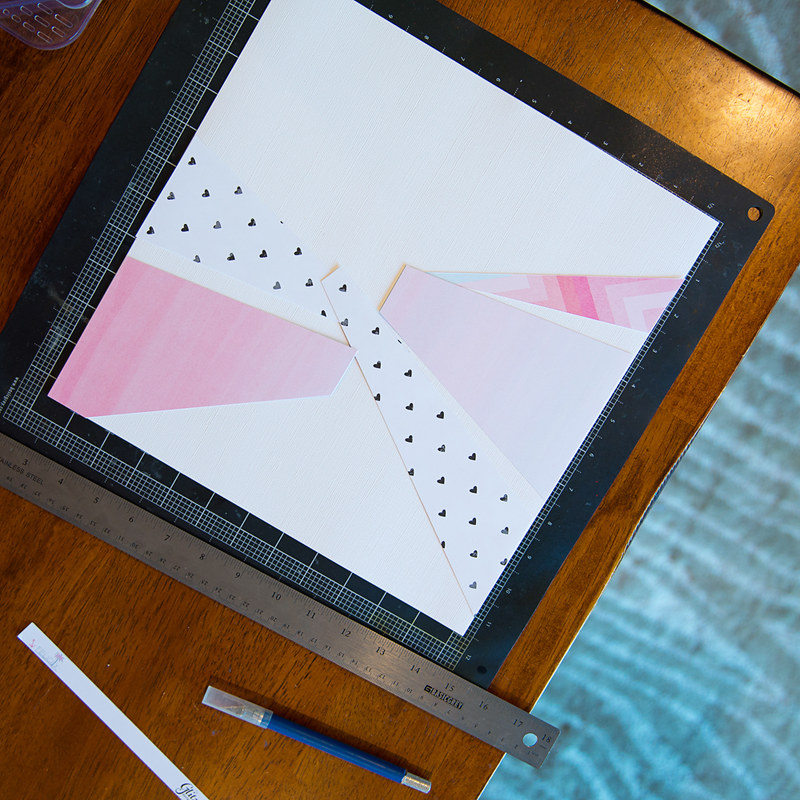
I'm sure there are a variety of ways to create "rays", the technique I use involves my trusty magnetic mat, ruler and a craft knife. After cutting each ray, I placed it on the background cardstock, rearranging pieces until I was satisfied with the layout. 

2014_0701_025a

2014_0701_065a

2014_0701_093a

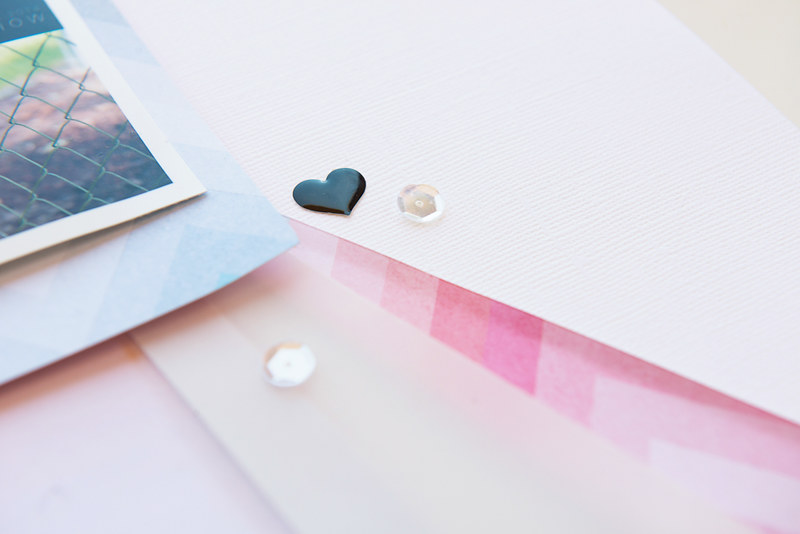
After all of the sunburst rays found their final resting places, I added the remaining layers covering the overlapping corners. To create more precise rays, mark a center point in pencil on the back of your paper, then draw lines with each running through the center point.

2014_0701_068a

2014_0701_072a

2014_0701_091a

2014_0701_105a

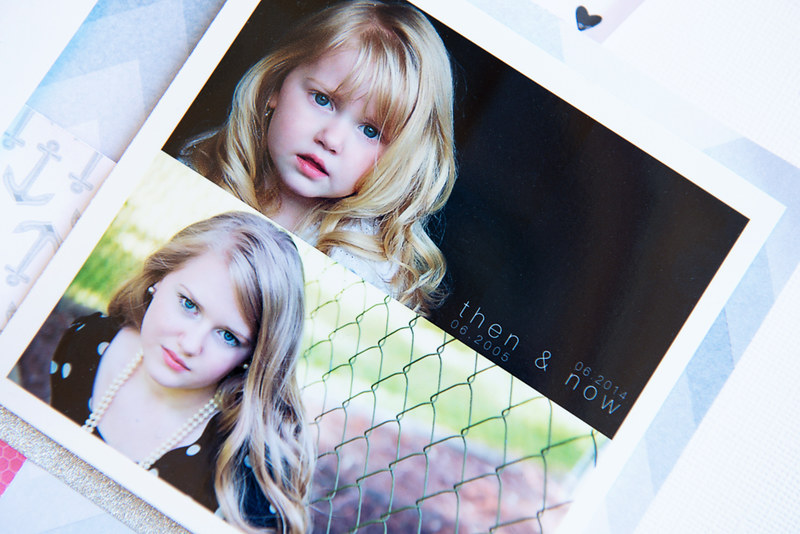
"Then & Now" layout supplies:
Glitz Design "Felicity" paper: Chevron
Glitz Design "Brightside" papers: Chunky Chevron, Bits & Pieces
Glitz Design "Felicity" 6x6 paper pad
Glitz Design "Brightside" Alphas & Accents sticker sheet
Glitz Design "Black & White" Alphabets & Words sticker sheet
Glitz Design "Black & White" puffy words sticker sheet
Glitz Design washi tape - silver glitter
other: cardstock  vellum, wood veneer people, sequins, chipboard ampersand  

Tuesday, January 26, 2010

watermark tutorial

the question i've been asked most often about my project 365 is how to get that scrolly watermark on the bottom. well, after some google searching, downloading, recording, editing, rerecording, editing again... having a random program shut down, starting over, then editing some more... i finished my first ever screen capture tutorial on how to make that cool scrolly watermark in photoshop elements for your pictures. in the tutorial i used photoshop elements 8. i am on a mac, but all of the instructions are the same for pc users. the brush i used for my tutorial is available here, but the options are endless for cool brush styles you could use. let me know what you think, or if you have any questions!


and because it's 2:33am right now, and i still have a few minutes before my video is done uploading, i'm going to throw the 365 picture from today in.

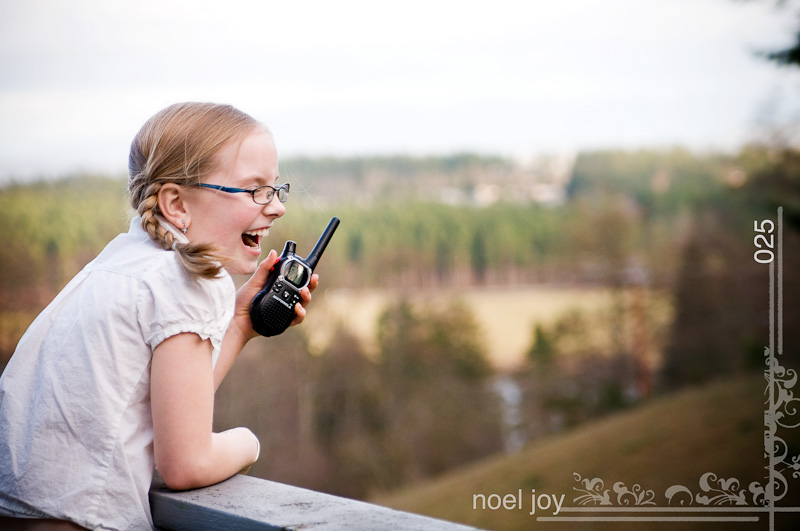
025.365
today was a much more sunshiny day, both in the weather and in spirit. i'm sure the one helps to encourage the other, and for both i'm thankful. i worked this morning at my killer 2.5 hour/a week job. (i am a receptionist/weigh in person for weight watchers. i'm not responsible on my own, so having to maintain my lifetime status to work there is a bonus. plus the girls i work with are fabulous!) it is an encouraging job though. having been on the other side of that weigh in table myself, it's wonderful to see people succeed on their journey. and it's equally as wonderful to come alongside people as they struggle (just like we all do) to make it to the next step. of course i am ever grateful for the people who encouraged me when i was there, and 41 pounds and three years later... i'm still so thankful for their constant encouragement!

wow, i'm not really sure where that tanget came from, i had intended to write about the girls playing with their walkie-talkies after school. hum, i am a distractable one, aren't i?! but yes, onto the picture of the day... the girls decided to make the most of the sunshine that was leftover after school and get some backyard playing in. they've recently rediscovered their walkie-talkies, and i've been blessed to hear them in the mornings getting ready saying things like, "yes, mom's doing my hair, but you better get down here quick. OVER." so after school they grabbed them again, and went to play outside in the waning light. emma got geared up like an explorer and set out around the house... torrey spied on her from the deck. i spied on torrey, who was spying on emma, who was being a goofball. this was the result of all that spying. :)

happy tuesday!

Thursday, February 5, 2009

eye spy

eye spy

i love photoshop. it has so many cool features, it seems like you'll never run out of cool things to learn. clearly my latest photoshop addiction is post processing pictures. mainly defogging and sharpening. all digital cameras leave a bit of a fog or haze on pictures that you don't really notice until you compare them side by side. i took this pic of my niece today when she & my sister stopped by this afternoon. the picture below is SOOC (straight out of camera). it doesn't grayish toned, and doesn't show off her beautiful greenish brown eyes. hurray for the magic of photoshop! oh and i got a fun new photoshop action today from mcp called eye doctor and dentist. this is one of the actions she makes that does work in elements (not all of them do), just check the item description if you're wondering. anyway, i was itching to try it out, so i begged maddie for a pic! :)

madison SOOC

how lucky am i that my mom, sister & niece came and had lunch with me today! my mom wanted a new facebook profile pic (LOL!) so she got her pic too. i'm not sure i really like how the post processing turned out... she looks kinda gray to me. sorry mom! but isn't she beautiful!

i also got another chance to try out my new super secret spy lens from photojojo. see madison holding the spy lens attachment with one creepy looking eye staring back at me. :) (my mom made that super cute little hat for her.)

now, it's way easier to get people who are standing or sitting still with the spy lens... but it is getting slightly easier to use. also, the more light you have available the better. once it gets warmer, i plan on bringing it to some bbq's and catching people unaware. my mom, sister, niece and i all messed around with it this afternoon. i got this shot of my mom knitting on my couch.

Thursday, September 25, 2008

processing pictures using a curves plug-in

using a curves plug-in
to edit pictures in photoshop elements

this is the before picture - SOOC (Straight Out Of Camera)
not too shabby, but could definitely use some brightening

**Click on any of the screen shot pictures to enlarge**
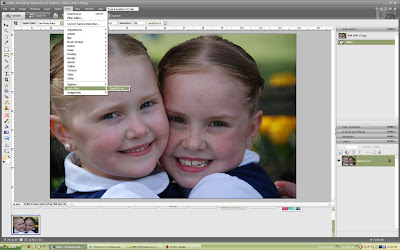
After installing the Smart Curve plug-in filter. Open your picture in PSE or PS (Photoshop Elements, or Photoshop). Click Filter > easy.Filter > Smart Curve to open the curves filter.
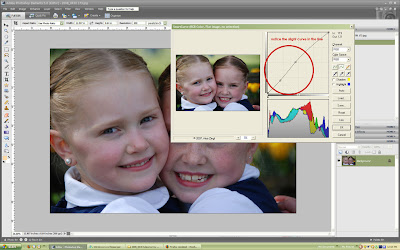
In the Smart Curve pop-up window there is a line that goes diagonally across the box in the upper right corner. Click somewhere near the center , and drag the line slightly up toward the upper left corner of the box. Now click toward the bottom of the line, and drag it slightly lower. (Notice the curve it creates in the screen shot above.) You're going to want to adjust your picture in steps, so don't worry about lightening it all at once.
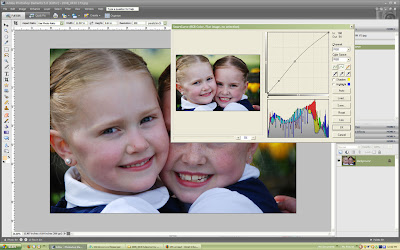
Repeat the same step again, making more slight adjustments.
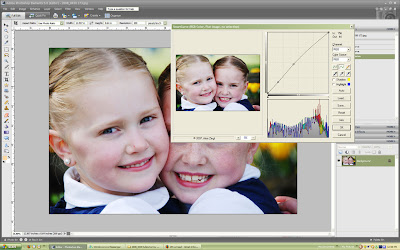
Repeat as many times as necessary to get your picture to the desired lightness. These adjustments will give the subjects in your pictures that milky looking skin tone that is popular in pictures right now.
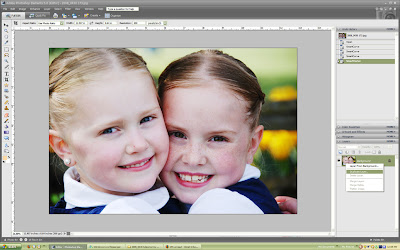
Now that your picture has been lightened using the curves filter, we're going to add some sharpening. Right click on the photo's thumbnail in the Layers Pallet and select Duplicate Layer on the fly out menu.
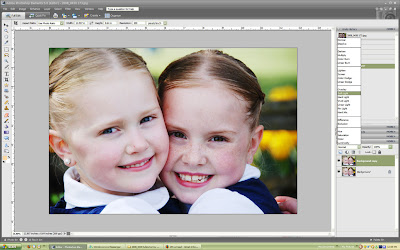
With the Duplicated Layer selected, we're going to change the Blending Mode. Click on the Blending Mode drop down menu and select Soft Light.
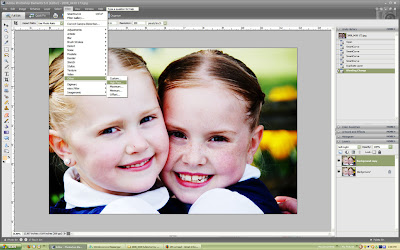
Now select Filter > Other > High Pass.
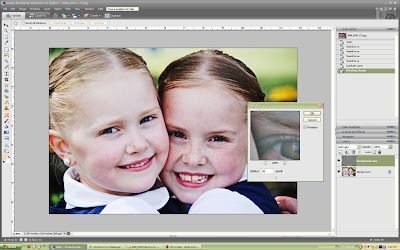
In the High Pass window, select the radius for your High Pass. I usually have mine set somewhere between 25 to 40 pixels. For this tutorial I selected 30 pixels for my radius. (You can experiment with different settings to see what you like best.) Once you've changed the radius to 30, click OK.
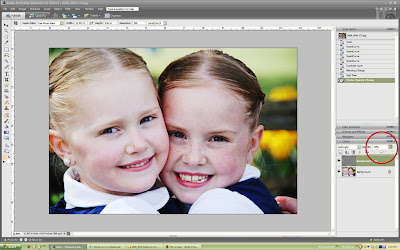
With the Duplicated Layer still selected, we're going to change the layer's opacity. I changed it to 40%. You can do this by clicking the Opacity drop down menu and using the slider, or by clicking in the box and typing in 40. Now your picture is sharpened for print.

Depending on how you're planning on using your picture, there are a few other processing tips you can use. Now, for the most part, I like to keep the pictures of my kids true to form. i.e. with scratches and bruises and chocolate milk mustaches in all their glory. However, there are times, say for Christmas cards, that you want a picture to be bruise & mustache free. For these special times, there is the Healing Brush.
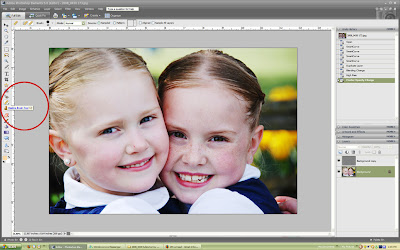
Click the Healing Brush icon on your tool bar. For this particular photo, I set my brush to 40 pixels. To remove the little scratch from Emma's nose, you simply move the healing brush right over the scratch, and click the mouse once. Repeat if necessary on other spots. The scratch magically disappears! Yahoo for Photoshop!
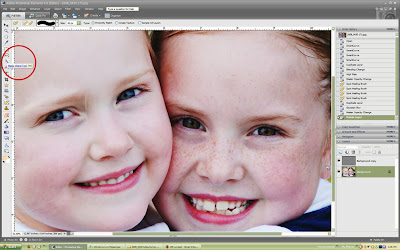
One other trick you see in photo processing right now are engaging eyes. Where the irises of the eyes are super sharp. Here is one way to accomplish that. Select the Magic Wand tool from the tool bar.
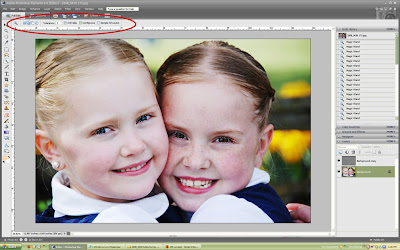

On the Magic Wand's tool bar, click on the two blue boxes which is the Add to Selection option. I also selected a tolerance of 5. (Anywhere beteen 5 and 10 works well for this type of selecting.) With your Background Layer selected, click on the iris of the eye. Continue clicking in the irises until they are completely selected. If you end up with other parts (say, the eyelids) selected, simply click on the white and blue box (Subtract from Selection) in the Magic Wand's tool bar, then click to subtract the unwanted area.

Once you are finished you should have a creepy looking dotted line around all of the irises in your picture.
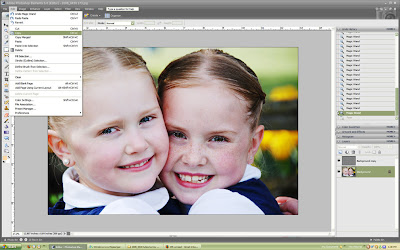
Click on Edit > Copy to copy the selection OR click CTRL and C (or on a Mac, Command and C)
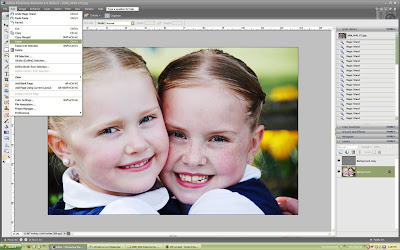
Then paste the selection by clicking Edit > Paste OR CTRL and V (Mac - Command and V)
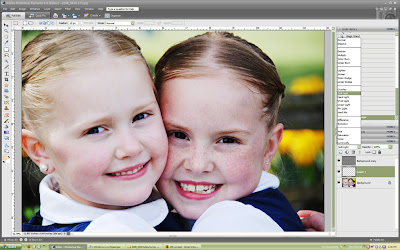
That pasted just the irises of the eyes onto a new Layer (Layer 1). With the new layer selected. Change the blending mode to Soft Light.
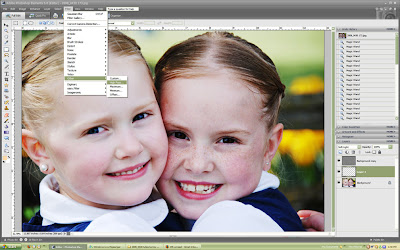
Now we're going to do another High Pass. Click Filter > Other > High Pass. In the High Pass window, 30 should still be the radius from before, so click OK.
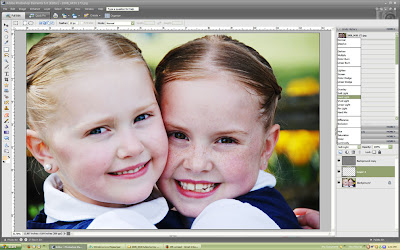
Now go back to the blending mode drop down menu, and select Hard Light. Depending on how much this made the eyes pop, you may want to lower the layer's opacity. I left mine at 100%, but be the judge on your photo. :)

To finish up and save. Right click on the photo's thumbnail, and select Flatten Image on the fly out menu. I like to keep the original copy of my photo just in case, so after editing I always select the Save As option. To do this, go to File > Save As OR CTRL and SHIFT and S. Then I usually just add an "A" to the end of my photo name. That way they're saved right next to each other in the same file.

This is my post processing photo.

If you made it to the end of this post... you seriously should give yourself a pat on the back! lol. I got this cute little "award" today from my very talented cool scrapping friend Tracy. And I've been told I need to nominate 7 blogs that I really enjoy... so here goes...

1. Oh Scrap! by the ever amazing Hawaiian chic Joscie
2. Just Us by the über talented Elizabeth
3. A Peek into my Life by my great scrappy friend Ali
4. Emilie Ahern by one of my great inspirations Emilie
5. decor8 - cool decorating blog
6. Hostess with the Mostess - a new favorite from just this week!
7. Easier Said than Done by my cool friend Laura
and one more just for kicks...
8. Blessed Beyond Belief by my digi scrappin mama


Tuesday, September 23, 2008

snapshots of our week and get ready for some photo fun

snapshots of our week
and get ready for some photo fun

we thought it was going to be tough when we moved to give up our water view... well, last week this was the sunrise i caught while drinking coffee on our deck. the fog in the trees makes it look like little islands in the water. needless to say, i'm quite happy with our new view. :)

just a fun shot of stan giving the girls a ride to the bus stop in the trailer of his john deere. oh yah... it's a redneck dream!

the girls have made a few little temporary projects that i just didn't want to lose forever when it was time to clean up. the popsicle stick fun was something they made saturday morning while still in their jamies. the domino "elefant" is currently on my living room floor. i just love the cute little things they come up with together.
this weekend torrey made a "me collage"... a collage all about her. each object is significant to her in some way, or tells something about her. it's going to be hanging in her classroom for the rest of the year, so i wanted to get a quick shot of it before she took it in this morning.

later this week i'm planning on posting a little tutorial on editing your photos in photoshop using a curves filter plug in (for you gretchen... sorry it's taken me so long!). I wanted to post the link to download the plug in ahead of time, so you can play along. :) click here to go to the smart curve download page.


OH!!! and one last thing! thank you so much for all of your well wishes and prayers for my grandma. she's back at home and doing well. they were able to fix her up as good as new with only some medication adjustments! thank you again!

LinkWithin

Blog Widget by LinkWithin